Showing posts with label diy. Show all posts

Friday, 27 June 2014

DIY Wedding Invitations

I am a bit of a stationery nerd. I love beautiful notebooks, I love exciting pens, and I love nice paper. I could have easily easily spent a lot of money on my wedding invitations, particularly when I discovered the gorgeousness of letterpress invites.

This is the 'Shelly' Design from Artcadia.co.uk.

I mean look. Just look at that.That gorgeous, thick, textured card stock, and the way everything is pressed into it, not just printed on it, giving this extra depth to the card. I cannot express to you how much I would have loved, LOVED, to have had beautiful letterpress invitations.

But we just couldn't justify the expense. Not with the knowledge that at best they would sit on someone's mantlepiece or fridge until the wedding, and then go straight into the bin. That's if they even made it to the mantlepiece, since I was recently told of someone's friend who had to fish the crumpled and battered invitation out from the bottom of their rucksack when questioned on what the date was, to the horror of the unfortunate bride who had lovingly commissioned them, getting a cartoon of herself and her groom done especially, and hand tied with lace and string. 

So, for both budgetary and pragmatic reasons, it was decided that making our own invitations would be the best way forwards.

I'd like to say we carefully planned what we would need and then sourced the most budget-friendly but high-quality materials, but actually what happened was that we got a bit overexcited in Hobbycraft and the Works Christmas sales, and then had to work out how to make the stuff we'd bought fit into a sensible design.


 We got the stamp at Hobbycraft, the craft leaves from The Works, and the gold ink and the cards from Amazon. Since we're having an Autumn wedding, gold and leaves seemed like a good way to go.


The tricky thing about the stamp was not smudging the ink as you stamped, particularly with the initial batch of cards, as the stamp was coming away more heavily coated in ink. I blotted as best as I could but they still took a bit of time to dry!


Once they were dried (I didn't do this with the initial batch, but did with later ones), I hairsprayed them, to hold the ink in place and try and prevent smudging. I just used my standard hairspray. It wasn't a perfect solution, but it meant that they didn't smudge all over the envelopes when I was putting the whole lot together. I think it would have stuck better had I not used a shimmery ink, as the shimmer came off when you rubbed your thumb over it, and that maybe contributed to a few smudges. Also perhaps the use of a more textured card stock might have helped grip the ink, although at the same time it might have made the smudging worse. You never know!


Next: Applying the leaves.

For this task, after contemplating with a dubious eye a sad-looking Pritt Stick, I remembered that I had, several years ago, bought a tiny glue gun and glue sticks in the vain hope that I might eventually start making my own cosplays and props (hahah yeah that didn't happen).


Every girl needs a tiny hot pink glue gun in her accessories case!
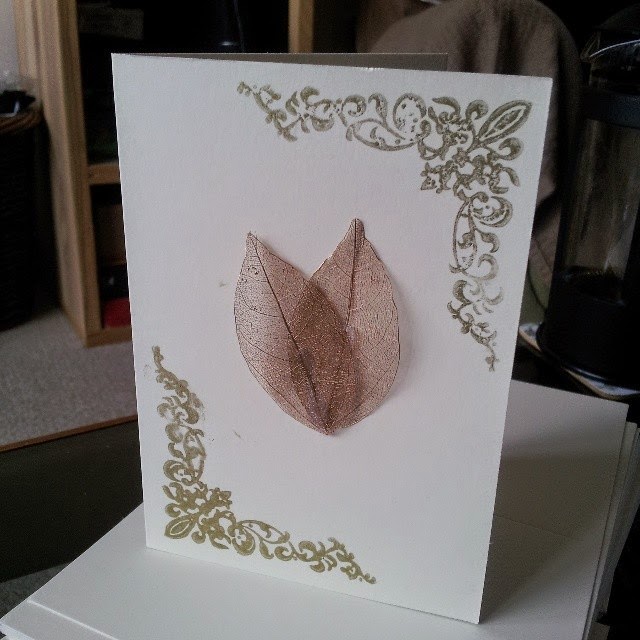

Ta-daa! The leaves glued carefully in place, not without learning that hot glue burns when you poke it (this is educational as well as entertaining, kids).


I ended up needing to make about 47 or so, but I did extras to compensate for smudging which had happened to some of them. Also spares to send off for alternative reasons, which I shall reveal later in the post!

The next step was to design the inserts - I ordered some lovely A6 postcards from PaperBox on Amazon, with a lovely texture to them. I designed the inserts in photoshop, using some free fonts gathered from pinterest and dafont.com, and then it was a case of some more glue gunning!


After that construction, it was a case of addressing the envelopes - which I had become a little nervous about since my post on the matter - however I realised that I could lightly pencil out the calligraphy first and then ink over the top. This actually worked as extra practice too, as I was making the shapes of the letters with the pencil, so my hand started to get used to the movements needed to achieve the desired effect.


I got these addresses from various blogs around the internet, which related that you could get a letter of congratulations from the Queen (only if you're British, I'm afraid), the President (possibly only if you're American, but no-one specified as most of the website are American) and the Pope. Plus it meant that I could show off my natty calligraphy without giving away the addresses of any of my friends and family.

To finish off, I made liberal use of some sealing wax I had kicking around the house, and the seal which came with the calligraphy kit.


Guys: Fiery wax also burns if you get it on your fingers. Just FYI.


And ta-daaa! That's it, my wedding invitations. Now just to wait for the RSVPs.

Thursday, 15 May 2014

DIY Distress

The one problem with deciding to make your own wedding invitations is the part where you realise that you have to send them out. And not just, you know, anonymously posted on the internet - you will be literally sending these things that you have spent months crafting, poured hours and hours of time into constructing, to every person you know and love.

Like that nightmare you had where you did something stupid in front of everyone you know and love.


When this realisation hits you - usually around the time you accidentally glue-gun one of the inserts slightly off-centre into one of the cards, or when you notice that the ink from the stamp has smudged a little around the edges, despite you hairspraying it twice for good measure - your stomach drops and you realise that maybe, maybe those things you've been working on since Christmas are in fact a little bit crap. And everyone knows you're making your own invitations because your mum has been telling everyone so proudly, but actually they're going to open the envelopes and see... these.


And it's too late to back out now because you'd never be able to get professional ones made in time, and of course because everyone knows you're making them yourself, they'll be really confused if they suddenly got non-homemade ones, so you'd have to answer questions about how it all went wrong, so it works out quicker if you just send out this trash and then people will be able to see just went wrong and will hopefully be British enough not to comment on it. Besides, it's not like there's anything you can do to fix it at this point.


Of course from there it starts to spiral.

What if nothing you've made for the wedding is any good? What if it's not just the invitations that suck, what if it all sucks?

And what if it's not just the stuff you made what if all the choices you have made, what if everything you picked for this wedding is going to look awful? What if once it's all put together it just looks like a hot mess of random colours and glue-gunned decorations, and everyone just sits there really awkwardly waiting until there's an appropriate point for them to leave so that they are no longer surrounded by all sorts of weird, poorly-coordinated things.

And then afterwards no-one will speak to you for a while, if ever again, because they've seen what's inside your mind and it wasn't nice for anyone.

And they're probably still all covered in glitter, even though you didn't use any glitter, but that's just the way these things always seem to turn out, with glitter stuck to people.


At this point you have to go and sit quietly somewhere and distract yourself in some non-alarming manner, possibly by watching a livestream of kittens, and take a lot of deep calming breaths.

After that you have to reaffirm yourself, it will be fine, people will like your things, and if they don't they will probably be too drunk to examine them too closely anyway, so it will work out either way.


Friday, 11 April 2014

Unwritten and Handwritten Rules

Weddings have rules for everything. And I mean literally everything.

The latest I have come across is how to address envelopes for the invitations.

This has only come up because we are at the point where we are presently getting ready to address our envelopes, and were thus exploring our options. Now, my handwriting is terrible. It's really quite appalling. My parents went through a phase of blaming my infant school for not teaching me how to write joined up (although I can, I just really have to concentrate), but then realised that actually it's just that their daughter is fundamentally incapable of writing neatly.

 haha I wish. For more beautiful gifs, check out calligifphy.tumblr.com.


As such, when my Mum presented me with a calligraphy set for Christmas just after I got engaged, this seemed like a potential avenue for exploration in the context of invitations. I began with a first burst of enthusiasm with the idea that I would naturally hand-calligraph ever single invitation, until I realised that would be SO MUCH WORK and did them on the computer instead.

I revisited the idea of calligraphy when we started gathering addresses to send out the invitations, as a way of addressing the envelopes. Naturally wedding planning is ridiculous, and Jon and I ended up having an argument that was far too involved for something as mundane as addressing envelopes. I didn't want to just write in my normal handwriting, because it would look awful. How awful?


However, Jon was of the opinion that a) calligraphy would be way too much effort, and b) my calligraphy skills were a bit rubbish really anyway, so what was the point if it was going to look crap?

I politely told him what I thought of his opinion, he responded likewise, and after a slightly heated discussion over the qualifications of both members of the debate, with a few less-than-generous allusions to each others respective intelligence and sense of taste, and queries as to what the other person knew anyway, the session was adjourned until we could be friends again.


When we reconvened half an hour later, the idea was batted around of printing labels with the addresses on, because that would be neater and we could be decorative without it looking awful. 

Except apparently that is Verboten. Not Allowed. Martha Stewart says NO.


"The address on a wedding invitation should be handwritten; printed labels are not appropriate (though calligraphy done by computer directly on the envelope is gaining popularity and acceptability)..." from HERE.


Well that's just dandy, Martha, but frankly I wouldn't trust my printer not to mangle any envelopes I put through it, and as demonstrated above my handwriting is less than appropriate if the reason you are declaring all this is for the sake of formality. And no, I can't afford to hire a calligrapher to write my addresses for me. I would rather spend that money on booze.

She then laughingly goes on to declare the invitation addressing etiquette has become more relaxed in recent years, but still gives 17 PAGES of exactly what you must and must not do.

 17 pages! And none of these rules are things which I even would have noticed were I the recipient of an envelope which broke any or all of these guidelines. I find myself wondering who has the time to sit down and consider how offended they would be if someone wrote 'Dr' instead of 'Doctor' on the envelope, or used an initial instead of a full first name, or god forbid printed labels instead of hand writing, even in aid of legibility.


Who has that sort of spare time? And who even spends that long looking at envelopes? Surely once it arrives you spend at most a minute investigating the postmark to try and guess who it is from, and then open it and immediately lose interest in favour of the contents which are generally much more interesting.


However, the overwhelming response from the internet was "NOPE". So for fear of actually offending someone we know who cares more about envelopes than we realised, we turned back to calligraphy. 


And lo, planning a wedding has accomplished what years of school could not - I am practicing my handwriting.


Eh, it's a start. Right?

Friday, 14 February 2014

Ebb and Flow, and DIY

The thing about having a long engagement is that excitement for the whole thing can wax and wane with the cycles of the moon. Occasionally it can be perked up by the prospect of planning that involves eating (I'm looking at you cake tastings, I can't wait), but can also be brought down by the prospect of anything that may involve any kind of deeper though than "Ooh that's cool let's do that."


I started planning early on with a fair amount of enthusiasm and a paranoid desire to make sure that nothing got inadvertently forgotten in the mix. But things took a break over Christmas and getting back into the saddle is proving trickier than anticipated. I suppose it's true that it couldn't feel like a great big party all the time, but I thought I might maintain at least a consistent level of motivation.


So, in an attempt to at least get something done and re-find my enthusiasm for the project, I gathered together the bits for a project I've been pondering since we decided to have an autumn wedding.

One of the reasons we decided to get married in the autumn was because there are such wonderful rich colours around then. However, I have observed that wedding confetti almost exclusively seems to come in pastels, white and pink and so on. Pastels are nice, but they just aren't us.

On my initial browsing for 'Autumnal Weddings', I found some glorious pictures of people using actual leaves as confetti instead.


This seemed like a lovely idea until I thought about it a bit more and remembered what Autumn in the UK is usually like:


This was accompanied by a sudden vivid recollection from my childhood where I grabbed fistfuls of autumn leaves and found myself suddenly being much closer than anticipated or desired to a lot of unexpected multi-legged beings who I had just suddenly ripped from their cozy new home on the ground in an attempt to stuff them down the back of my little brother's jumper. I suddenly had visions of being pelted in the face with damp, muddy leaves and finding myself with earwigs down my cleavage on the day when perhaps, even more than any other day ever, I would not want earwigs down my cleavage. (For starters, as I discovered last year whilst moving house, it's not that hard to fish a giant fuck-off spider out of your bra at speed when the situation requires - picture of said spider next to my car keys for size reference, the key is about 3 inches - but when one is trussed into a dress that requires help to get in and out of, and with at least three different types of closure for holding it in place, the situation may become more complicated).


It occurred to me that it might be fun to get some autumnally-coloured tissue paper, some shaped hole punches, and to make my own bug-free leaves. Because why not.

I gathered my tools (and roped in the help of a visiting and agreeable friend)!


Four different colours of tissue paper, four different leaf shapes, and three different colours of organza bags for putting confetti in when it was done, that I bought when I got a bit overexcited the first time I went to Hobbycraft.

You know when you think something will look good, and it looks great in your head, but then when it comes to actually doing it you start panicking that actually it's going to look awful, but you do it anyway and then it turns out that it does look like you imagined it would? That's a great feeling.


Of course I will now be spending basically the whole rest of the year making this so I have enough, but it will keep me off the streets, mugging old ladies, so it's win-win really.


Pee Ess, Happy Valentine's Day y'all!


Friday, 1 November 2013

Fun with Fruit

And yes, I checked. Botanically speaking, Pumpkin is a fruit, because it's got seeds in.


Because we are having an Autumn wedding, I was really quite taken with the idea of using a mixture of autumnal foliage and pumpkins to decorate the reception. Not because I want a Halloween-y wedding, as one florist seemed to think, going on to suggest that she had jack-o-lantern and spider-shaped table confetti that might look nice (maybe, but not what I was after); rather, I like pumpkins, they make me smile, and they're also I think a nice, classy little nod to Jon's half-Canadian background.


Pinterest, that most dangerous of websites, provided ample examples of nifty pumpkin-decorations, thusly:


(if anyone can provide sources for these, that would be great - I've tried searching but the pinterest links lead to seemingly unrelated pages, and image searching it only brings up... more pinterest pages)


But not only was I enlightened to the idea of stuffing flowers in these seasonal gourds, but to the full range of decorative carving which could be done! Martha Stewart offered these twinkly, and exciting examples:


Although she wanted to cheat and stick fairy lights inside rather than a candle. Whut, Martha?

There were some beautiful decorative carvings as well, which were very elegant!


Now, in the UK, Pumpkin isn't really a big thing. It's literally only available for the two weeks before Halloween, and most people wouldn't even consider doing anything but carving it, so trying to find pumpkins that would be suitable for pumpkin pie this year was a bit of a trial. This meant that we had a two-week window to get hold of some pumpkins to have a go at this carving malarkey and see if we were capable of doing anything more than leering faces. HOWEVER, Jon accused me of attempting to ruin Halloween if I didn't do some that were at least marginally spooky, so instead it became more of a practice at using stencils.


Tadaaaa! Here they are, in all their mismatched glory. I'll let you guess which ones were by Jon, and which ones were by me, the 'Halloween Grinch'.

I got very excited about the prospect of projecting an image onto the wall behind the lanterns, and experimented with this to a greater or lesser effect (with mixed success).


Whilst Jon challenged himself to a more complex spin on the traditional theme.


However, Jon also told me, whilst we were beavering away with our carving, that he didn't want carved pumpkins around the place because they'd look rubbish in the day time. 


It's like he hasn't listened to anything I've been talking about for the past year, honestly. Back to the drawing board we go! Let's hope we're on the same page this time, and that he's paying attention.